Forget everything you know about business banking
Countingup offers what traditional banks don’t – money, accounting and tax in one smart app.


Trusted & loved by over 100,000 UK small businesses
Apply in 4 mins
And start accepting payments straight away
Smart business current account
Everything you get in a modern bank account
UK-based support
A human customer support team you can chat to live in-app
Free 3 month trial
Try all of Countingup’s features – no strings attached
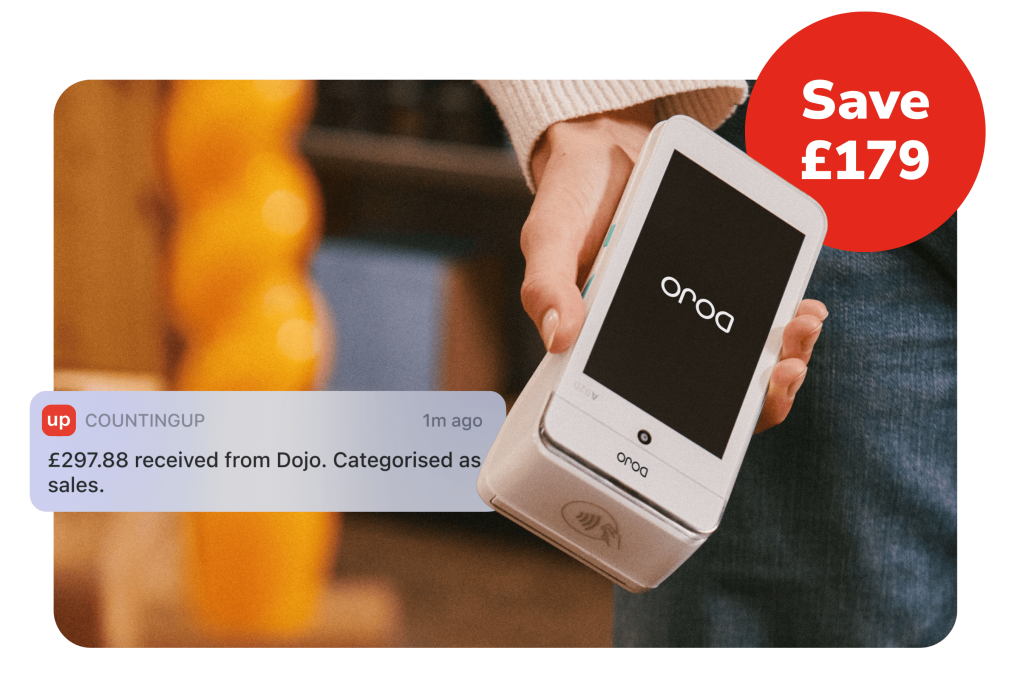
Get a free Dojo Go card reader
Open a Countingup business current account with a free 3 month trial and start taking super-fast card payments with a free Dojo Go (RRP £179).
- Exclusive deal for Countingup customers. *Offer valid for new Dojo customers only
- Receive your free Dojo Go in a few days after claiming
- Built-in WiFi and 4G so you can take payments anywhere
- Accept all major payment options including Apple Pay and Google Pay
We offer more than a traditional
business bank account
Time is money.
We save you both
Get a business current account, accounting and tax tools in one smart app from just £3/month. No switching between tools, no juggling spreadsheets and no paying for extra software.
Bookkeeping?
Sorted
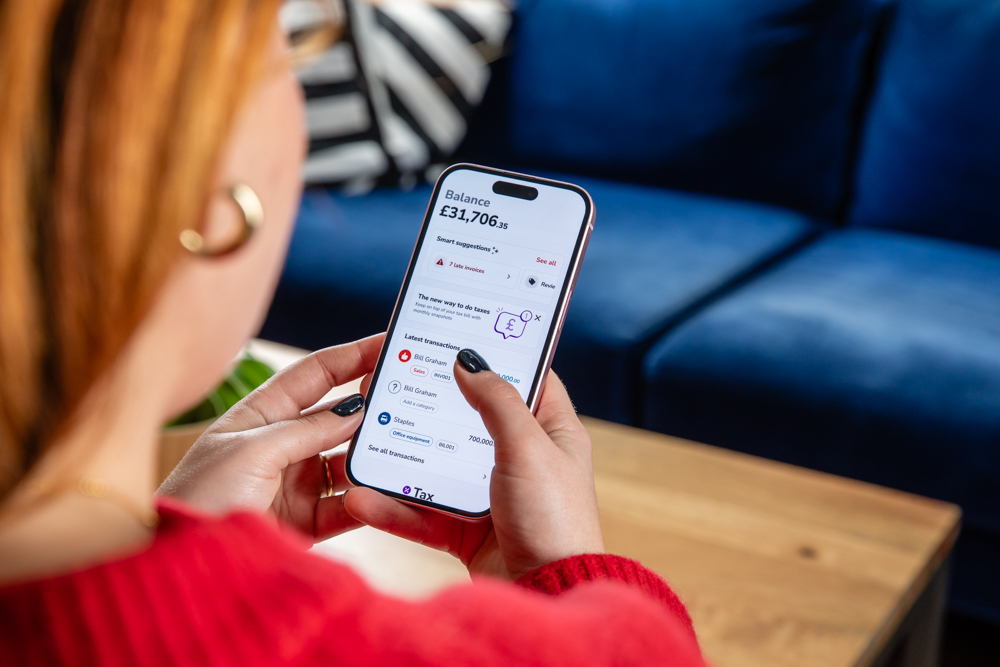
Because your business current account IS your accounting system, invoices are matched to incoming payments, transactions are automatically categorised and you can attach receipts as you go. No need to switch between software.
Less admin. More of what you love
Send personalised invoices, share payment links and get paid faster without the follow-up. Smart Suggestions flag late payments, missing receipts and uncategorised transactions, so nothing slips through the cracks.
The smart way to do your taxes
With fully automated taxes, Countingup does the heavy lifting. SmartTax AI updates your tax estimate in real-time, sets money aside for tax every time you’re paid, flags allowances you’re eligible for and reminds you of key deadlines.
Protection as standard
You’re covered by our latest security features, including biometric logins, dedicated security and compliance teams, and the ability to freeze your card or contact us 24/7 if you suspect fraud. With us, your business is in safe hands.
All the finance tools, none of the fuss
- Free invoicing & payment links Create and send personalised invoices in just a few taps
- Get paid faster Accept payment by card or easy account transfer on invoices and payment links
- Free Dojo Go card reader (RRP £179) Claim yours and take super-fast payments anywhere and everywhere
- Unpaid invoice notifications Countingup tracks late payments – one less thing for you to worry about
- Receipt capture & storage Snap, attach and store receipts, so everything’s ready for tax season
- Financial reporting & insights See exactly how your business is doing with real time insights at your fingertips
- Automatic categorisation SmartTax AI automatically assigns each transaction to the correct tax category
- Real-time tax estimate Your tax estimate updates automatically based on your income and expenses
- Save smart with tax pots Set aside a % of your income every time you're paid or top up your tax pot in a tap
- Never miss a tax deadline Countingup syncs directly to Companies House to give an accurate timeline of deadlines
- Unlock hundreds in tax savings SmartTax AI flags tax allowances your business qualifies for like trivial benefits and work from home allowance
- Free & fast VAT filing File your VAT returns directly to HMRC from the app at no extra cost
- Connect with your accountant Accountants get direct, secure access to your data through the Accountant Hub
- Business debit Mastercard® Pay for expenses with your card, just like a traditional business current account
- Deposit cash at PayPoint & Post Office Over 27,000 locations nationwide. Just take your card and cash to deposit
Countingup has been fantastic for my business, so simple to use and makes doing my accounts very easy by categorising all payments. I thoroughly recommend Countingup for all your business finance needs!
Neil Smith Painter & Decorator Ltd
The app allows you to run everything from your phone, from creating and sending invoices, uploading receipts, great accounting software and a tax pot to ensure you're never left in a sticky situation with tax & VAT.
Team Ubique Wall Tie & Damp Proof Specialists Ltd
Cover money, accounting & tax with one subscription
Our plans are based on your monthly income, you only pay more as your business grows. Plus you get a business current account, accounting and tax tools included – that means big savings on separate accounting software, tax filing tools and accountant fees.
We already support over 100,000 UK small businesses. Will you be next?
Is my money safe?
We’re an agent of PPS who are regulated by the Financial Conduct Authority (FCA). As an e-money institution, PPS protects your money through a process called safeguarding.
Safeguarding means your money is kept completely separate from PPS’s own money. So if you ever need to withdraw your funds or request a refund, your money is there and available.
PPS is also required to go through annual independent audits to make sure these safeguarding processes are working as they should and that your money is properly protected. Please note that your money is not protected by the Financial Services Compensation Scheme (FSCS).
A few important things to know:
- Safeguarding applies to all Countingup customers, with no defined limit per customer or account (aside from our usual account balance limits). This means that all the money within your Countingup account is protected.
- In the unlikely event that PPS fails, there is no limit to the amount of your money that is protected. However, some costs may be taken by an administrator or liquidator to cover the cost of returning it. This could impact the amount that you receive and take a bit more time to get your money back.